Introduction
Crimping BNC connectors onto coaxial cables is an essential skill for professionals and hobbyists working with audio, video, and data equipment. BNC connectors are widely used in various applications, including test equipment, avionics, and video signals. This article addresses the core question: How can you effectively crimp BNC connectors onto coaxial cables? Mastering this process is crucial for ensuring reliable and high-quality signal transmission, which is often compromised by improper connections. A common misconception is that crimping is a simple task that anyone can accomplish without proper technique or tools. However, this can lead to connectivity issues and equipment failures. In this article, you’ll learn step-by-step instructions for crimping BNC connectors, the tools needed, and tips for achieving a secure connection.
Understanding BNC Connectors and Coaxial Cables
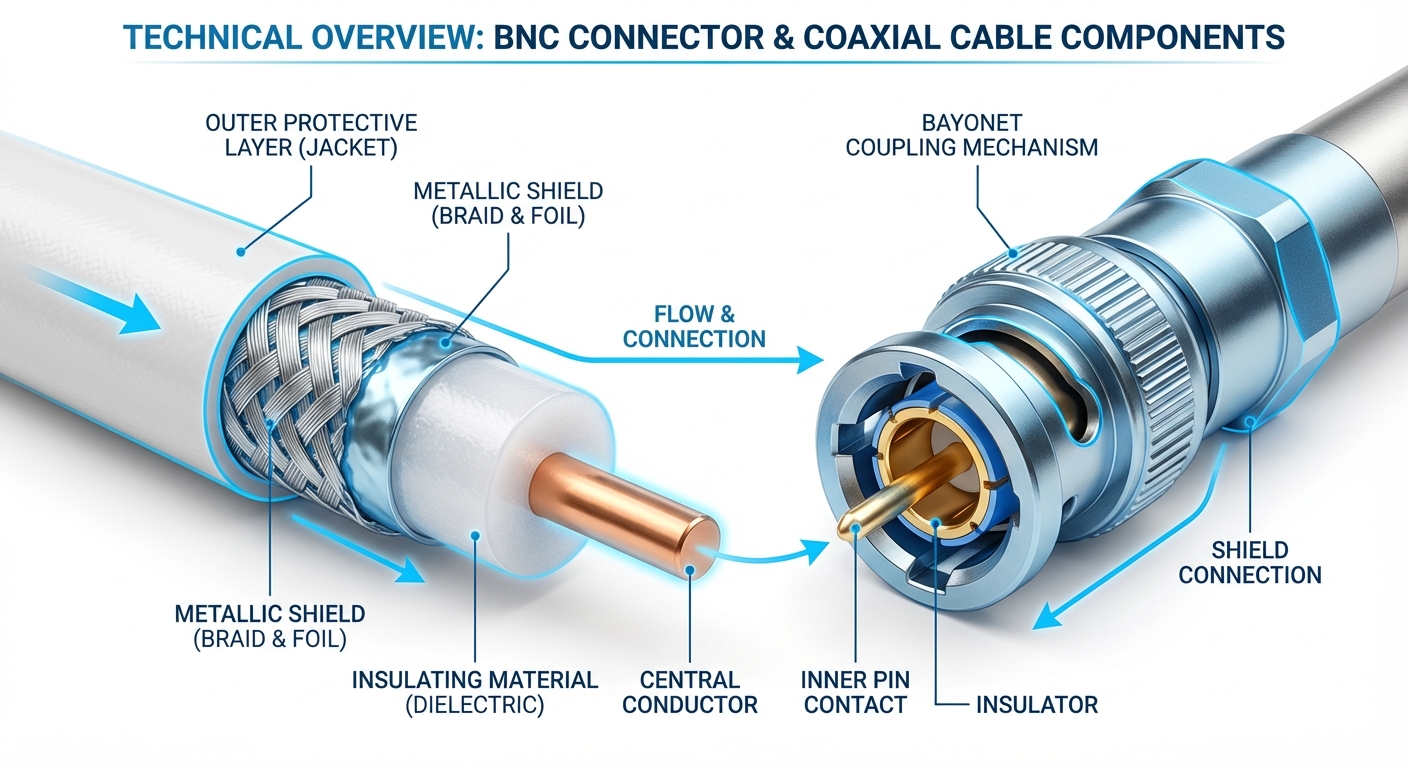
BNC connectors are coaxial cable connectors that provide a simple, reliable way to connect equipment. Commonly used for video and radio frequency signals, these connectors have a bayonet-style coupling mechanism that allows them to lock securely into place. Their compact design and ease of use make them a favorite in various fields. Coaxial cables, on the other hand, consist of a central conductor surrounded by insulating material, a metallic shield, and an outer protective layer. The combination of these components ensures minimal interference and signal loss.
Types of Coaxial Cables
Different types of coaxial cables are used depending on the application:
- RG-59: Commonly used for video signals; suitable for short runs.
- RG-6: Typically preferred for satellite and digital cable TV; provides better shielding and higher bandwidth.
- RG-400: A military-grade cable used for RF applications, known for its flexibility and durability.
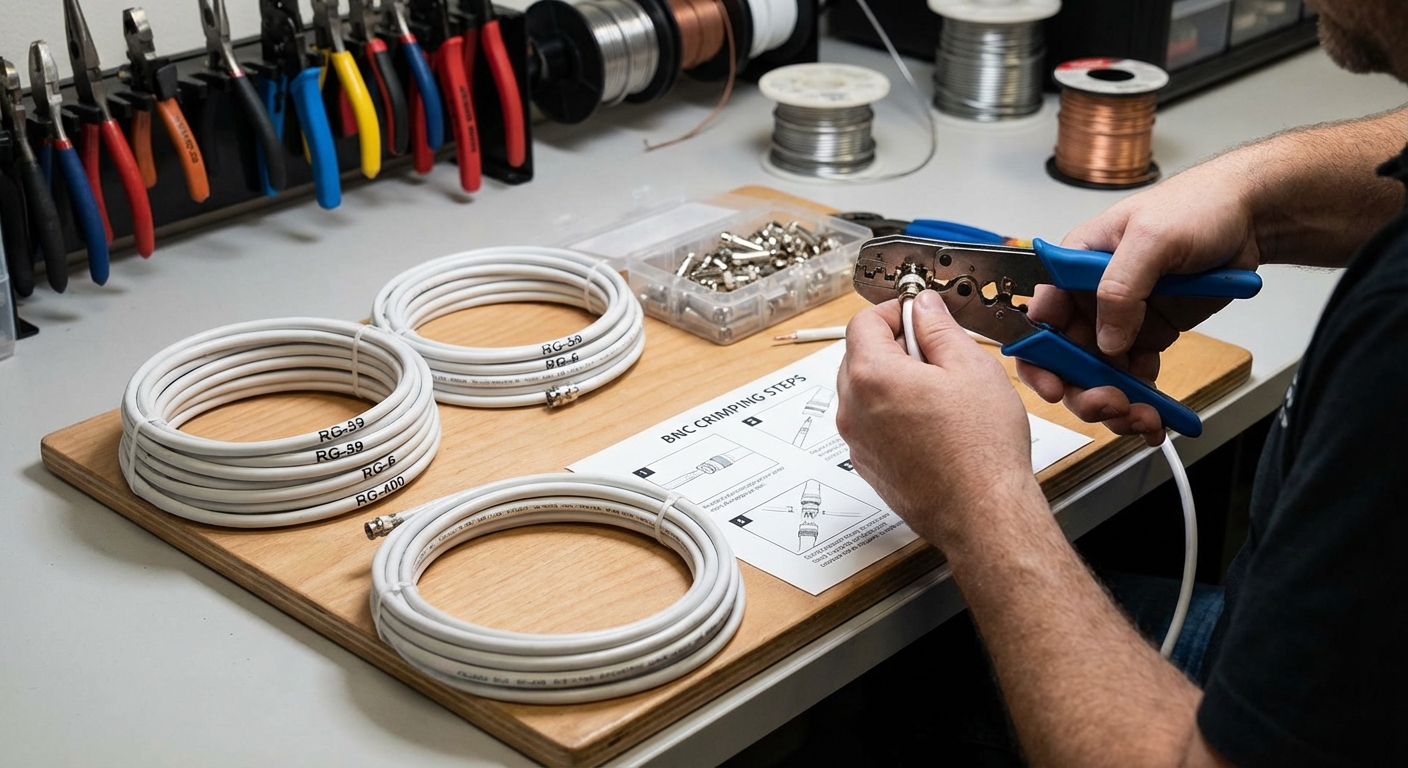
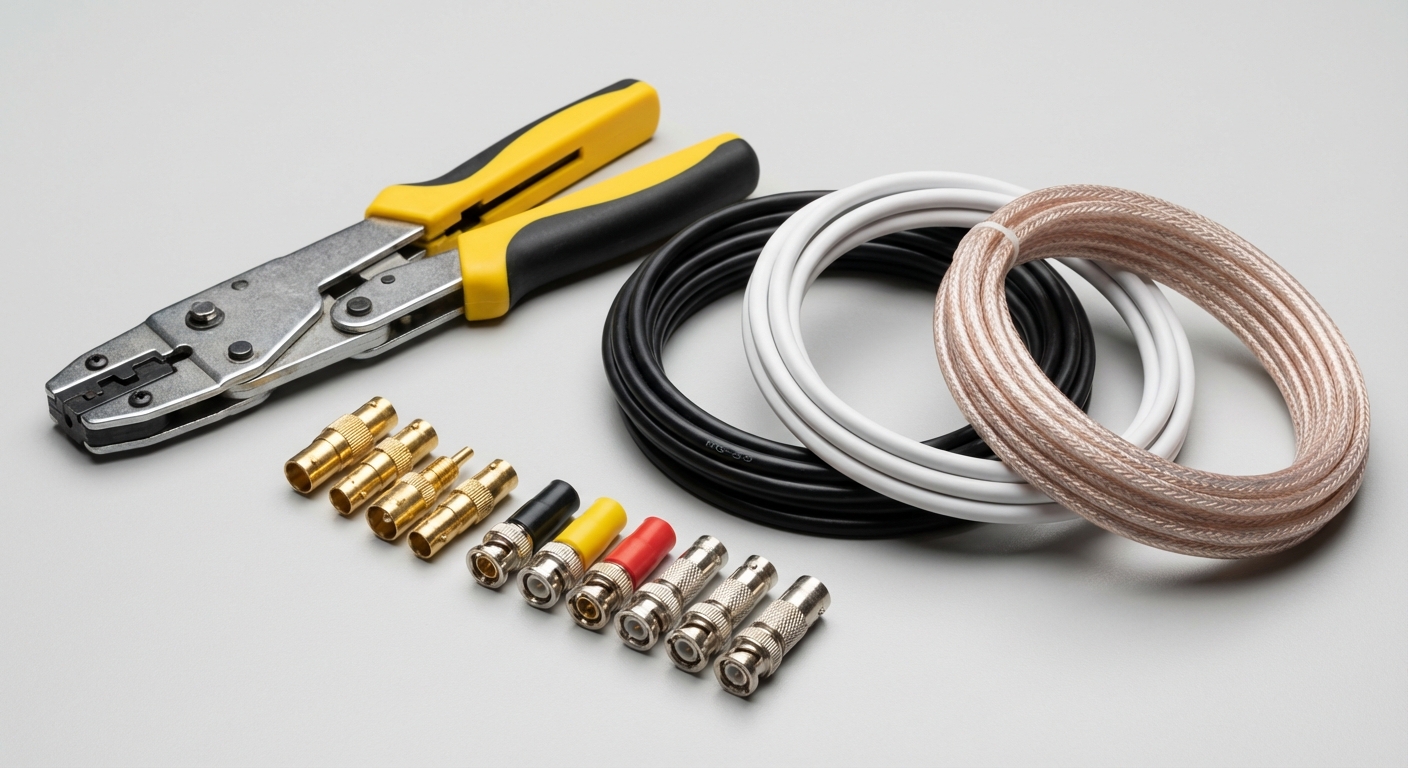
Tools Needed for Crimping BNC Connectors
Before starting the crimping process, gather the necessary tools:
You may also like


- BNC crimp connectors (suitable for your coaxial cable type)
- Coaxial cable stripper
- BNC crimping tool
- Wire cutters (optional, for cable preparation)
Step-by-Step Guide to Crimping BNC Connectors
Step 1: Prepare the Coaxial Cable
Begin by cutting the coaxial cable to your desired length. Use the wire cutters for a clean cut. Then, use the coaxial cable stripper to remove the outer insulation, exposing the shield and center conductor. Be sure to expose about ¾ inch (1.9 cm) of the center conductor and approximately ½ inch (1.27 cm) of the shield.
Step 2: Slide the Connector onto the Cable
Take the BNC connector and carefully slide the barrel piece onto the stripped end of the RG cable, making sure to insert the small end first. The center conductor should be visible through the connector.
Step 3: Fold the Shield Back
Once the connector is in place, gently fold the exposed shield back over the connector. This step ensures that the shield makes contact with the connector once crimped, allowing for proper grounding and signal integrity.
Step 4: Crimp the Connector
Using the BNC crimping tool, position the cable and connector within the tool’s jaws. Apply even pressure to crimp the connector onto the cable. The crimping process should securely attach the BNC connector to the coaxial cable. Make sure the connector doesn’t turn or slip during crimping.
It’s advisable to double-check the connection visually; the shield should be properly folded around the connector, and the center conductor should be fully engaged within the connector.
Step 5: Test the Connection
After crimping, it’s crucial to test the BNC connection with a multimeter or other testing equipment. Look for continuity between the center conductor and the shield and ensure there are no shorts between the center conductor and the shield.
Common Issues and Fixes
During the crimping process, you may encounter some common issues:
- Poor Signal Quality: If you’re experiencing signal issues, verify the crimp quality, ensuring there are no loose connections.
- Connector Damage: Avoid excessive force while crimping, as this can damage the connector.
- Improper Stripping: Ensure that you are stripping the right amount of insulation. Too much exposed wire can lead to interference.
Conclusion
In summary, crimping BNC connectors onto coaxial cables requires precision and a step-by-step approach. Proper preparation and the right tools are key to ensuring a reliable connection. Mastering this skill will enhance your capability to work with various equipment in audio and video applications. Related topics include understanding coaxial cable characteristics and best practices for other types of connectors.
FAQ
Q: What is the main purpose of BNC connectors?
A: BNC connectors are used to connect coaxial cables for video and radio frequency signals in various applications.
Q: Can I reuse BNC connectors?
A: It’s not advisable to reuse crimped connectors as they may not maintain the same integrity and performance when removed.
Q: What type of coaxial cable should I use with BNC connectors?
A: Common options include RG-59, RG-6, and RG-400, depending on your specific application requirements.
Q: How do I know if I crimped correctly?
A: After crimping, visually inspect the connections and test with a multimeter for continuity.
Q: What tools are necessary for crimping BNC connectors?
A: You will need BNC connectors, a coaxial cable stripper, and a crimping tool designed for BNC connectors.
For more in-depth information about connectors and cables, visit Wikipedia. Additionally, check out manufacturer support for specific products at Tektel.com.
Rotating USB