Introduction
The red light on a motherboard can be a disheartening sight for any PC user, signaling potential issues that may prevent your system from booting correctly. Understanding how to diagnose and fix this problem is vital for maintaining your computer’s performance and longevity. This article addresses the exact question of how to fix a motherboard red light with color codes, a common concern among computer enthusiasts and everyday users alike. This issue matters because it can indicate critical hardware failures or improper setups that could lead to system malfunctions. One prevalent misconception is that a red light always signifies a broken motherboard, while it can sometimes point to minor issues such as loose connections or depleted CMOS batteries. Throughout this article, you will learn various diagnostic steps and troubleshooting methods to address the red light on your motherboard effectively.
Understanding the Motherboard Error Light
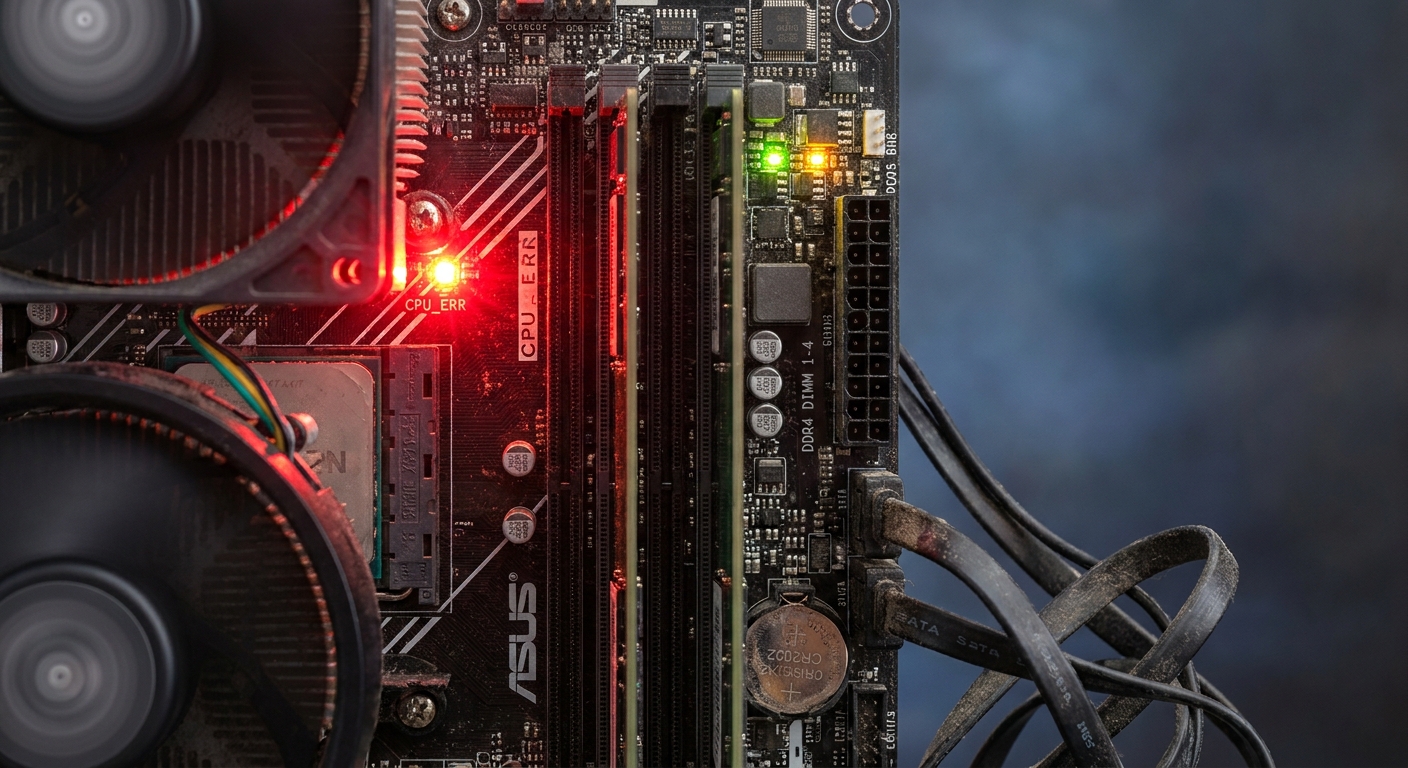
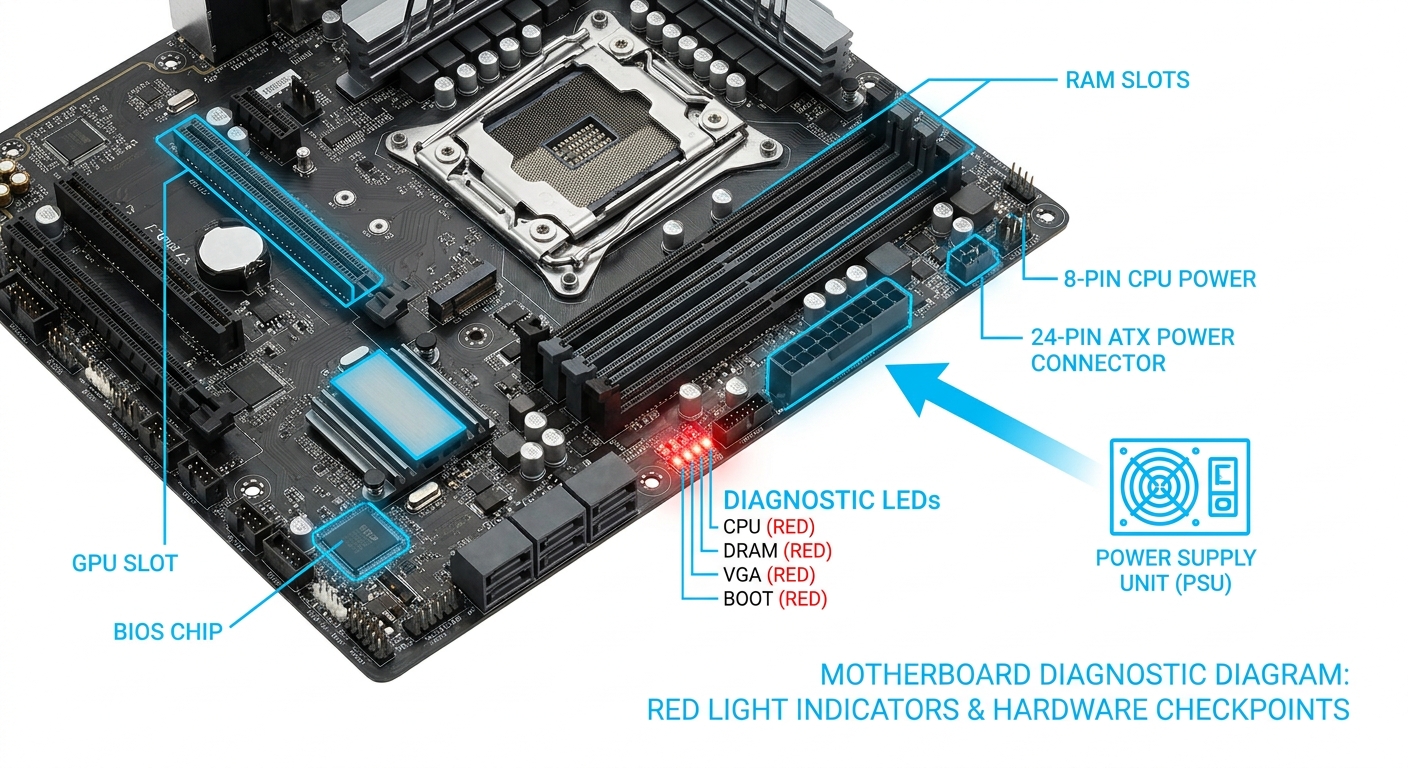
Motherboards usually come equipped with diagnostic LEDs that light up in various colors to indicate the system’s status. While the exact meaning of these lights can vary among manufacturers, a red LED typically signifies an error that needs immediate attention. Before diving into fixes, it’s essential to identify what the red light corresponds to by checking labels or the user manual specific to your motherboard model. For most boards, a red light suggests issues such as power supply failures, RAM or GPU malfunctions, or BIOS settings that require adjustment.
Common Causes of a Red Light on Your Motherboard
The red light on your motherboard can be triggered by several factors, each requiring different troubleshooting approaches:
- Loose Connections: Improperly connected components often cause the red error light to illuminate. Check all cable connections to ensure they are secure.
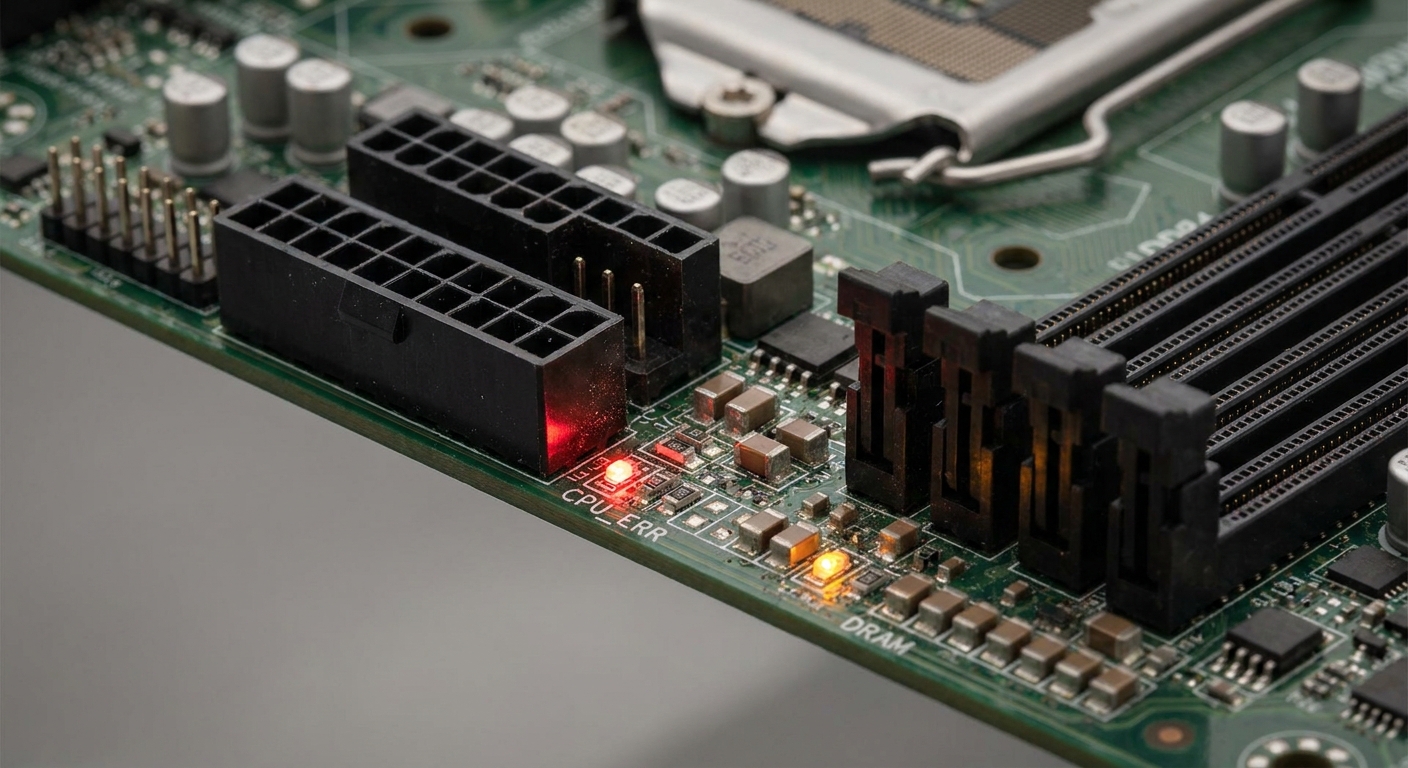
- Faulty Hardware: A failing motherboard or power supply unit (PSU) might be behind the red light. These components are critical for system functionality.
- CMOS Battery Issues: A depleted CMOS battery can lead to BIOS settings becoming unstable. Replacing the battery is often a simple fix.
- RAM or GPU Malfunctions: If these integral components are improperly seated or defective, they might trigger the motherboard’s error light, especially if you receive beep codes during boot-up.
- Bios Configuration Problems: Incorrect BIOS settings might cause the motherboard to fail to boot properly.
Troubleshooting Steps for Fixing the Red Light
Here’s a step-by-step guide to diagnosing and fixing the red light issue on your motherboard:
You may also like


1. Check Connections and Cables
Begin your troubleshooting process by checking all connections:
- Ensure that all power cables—from the PSU to the motherboard, CPU, and peripherals—are securely connected.
- Inspect SATA and IDE cables for proper seating. A loose cable can prevent data transfer and lead to errors.
2. Assess System Components
After confirming tight connections, evaluate your system components:
- Remove and reseat your RAM and GPU. A poor connection here is a common reason for hardware failures.
- If you have multiple sticks of RAM, try booting with one stick at a time to isolate a faulty module.
- Test your GPU in a different PCIe slot, if available.
3. Reset the CMOS
This step is critical if you’ve recently changed hardware settings. To reset the CMOS:
- Power down your computer and unplug it.
- Remove the CMOS battery from the motherboard for about five minutes.
- Alternatively, use the reset jumper method if available on your motherboard.
- Reinsert the battery and power the system back up.
4. Replace the CMOS Battery
If resetting the CMOS did not resolve the red light issue, consider replacing the CMOS battery, especially if your motherboard is several years old. A low or dead battery often leads to problems such as the red light illuminating due to lost BIOS settings.
5. Check for Beep Codes
During the boot process, listen for any beep codes that may indicate hardware failure. Refer to your motherboard’s manual to interpret these codes effectively, as they can provide significant guidance on what is malfunctioning.
6. Test with Minimal Setup
To narrow down the issue further, disconnect unnecessary peripherals and components.
- Remove additional drives/SSDs and external devices.
- Try booting the system with only essential components connected (CPU, one stick of RAM, and onboard video if available).
7. Inspect for Hardware Failures
If none of the above steps resolve the issue, inspect for physical damage on the motherboard or assess the functionality of the PSU. In some cases, testing with a known good PSU or motherboard can help identify the problematic component.
8. Consider Replacement
If troubleshooting confirms hardware failure, it may be time to replace either the motherboard or power supply. Factors such as age and effectiveness should guide your decision.
FAQ
Q: What does a red light mean on my motherboard?
A: A red light typically indicates a problem with hardware, such as a loose connection, a failing component, or a BIOS setting issue.
Q: How do I reset the CMOS on my motherboard?
A: To reset the CMOS, power off your computer, remove the CMOS battery for several minutes, and then reinsert it. Alternatively, refer to your motherboard manual for jumper settings.
Q: Can a faulty PSU cause a red light on my motherboard?
A: Yes, a failing power supply can prevent your system from booting and trigger the red light.
Q: How do I know if my RAM is defective?
A: You can test your RAM by booting with one stick at a time or using memory diagnostic tools to check for errors.
Q: Is it always necessary to replace the motherboard if the red light persists?
A: Not necessarily. Many times, the problem can be resolved with troubleshooting, but if all else fails and there’s evidence of failure, replacement may be necessary.
Conclusion
Identifying and fixing a red light on your motherboard involves a systematic approach to troubleshooting. By checking connections, assessing hardware, and utilizing simple diagnostic steps, you can often resolve the issue without the need for costly repairs. Remember, if problems persist, consider seeking professional help or replacing faulty components. For further information on motherboards, visit Wikipedia. If you require specific support regarding your motherboard, check the manufacturer’s support page.
Rotating USB