Introduction
Understanding PC fan wire color codes is crucial for anyone working with or building computers. The intricate world of PC fans, designed to keep components cool, may seem straightforward, but the differences between fan types can lead to confusion. The primary question this article aims to address is: What do the various wire colors in 3-pin and 4-pin PC fan connectors signify? This topic matters not only for ensuring proper installation and functionality but also for avoiding potential damage to hardware. A common misconception is that all fans use the same wiring scheme, which can lead to improper connections and, consequently, system failures. In this article, readers will learn about the purpose of each wire in 3-pin and 4-pin fans, the differences between these fan types, and how to troubleshoot potential issues with PC fan connections.
Understanding PC Fan Types
PC fans typically come with either 3-pin or 4-pin connectors. Each type has its specific wiring and functionality, suitable for different applications within a computer system.
3-Pin Fans
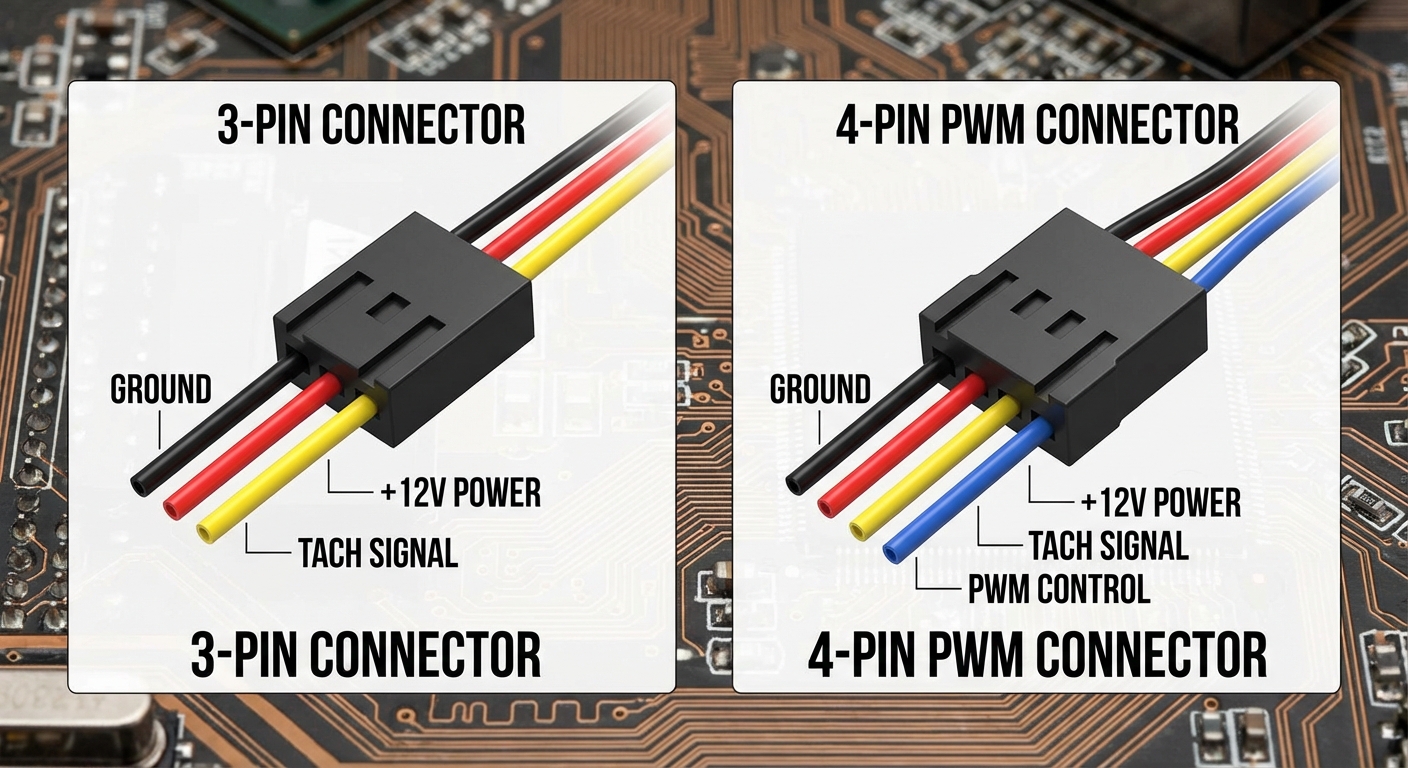
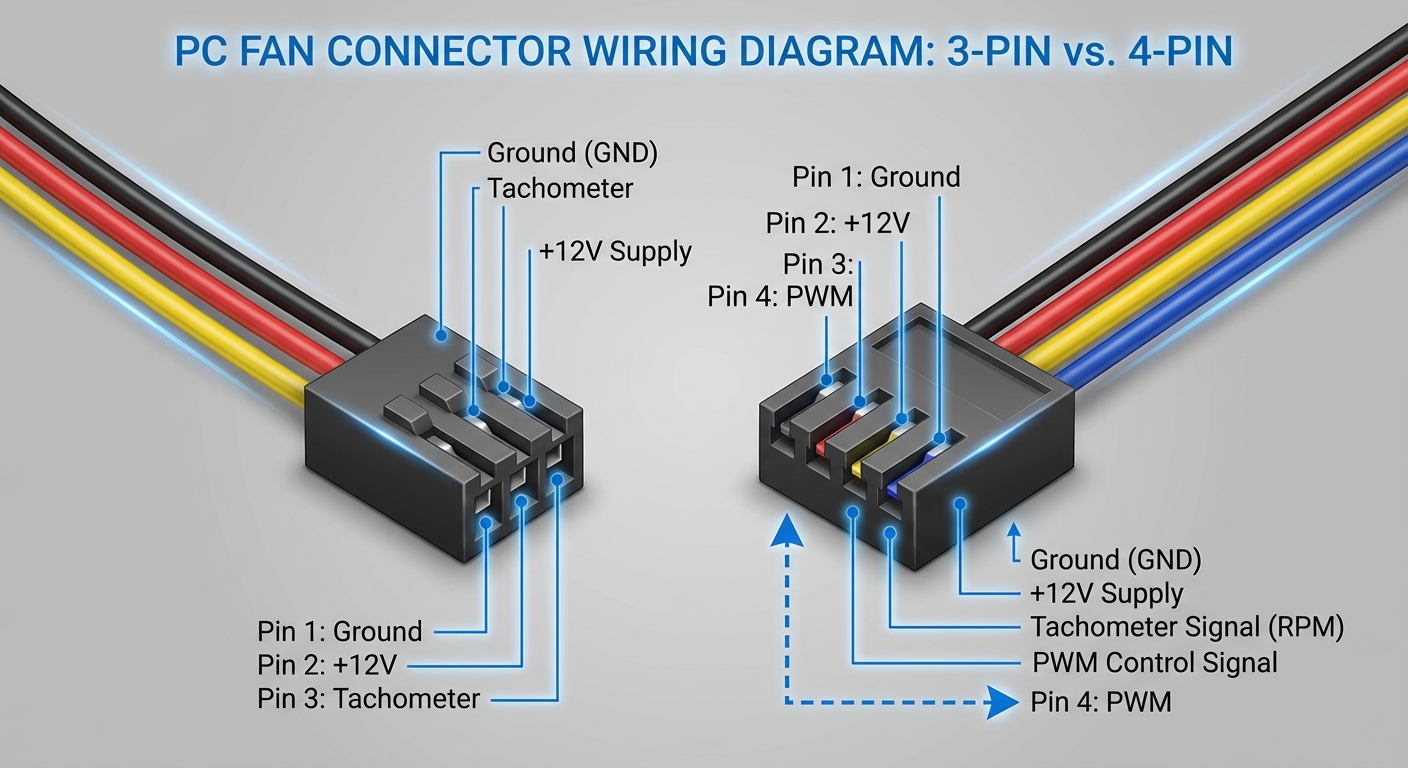
3-pin fans, commonly used for chassis cooling, have a straightforward design. They feature three wires, each corresponding to a specific function:
- Pin #1 (Ground): Usually black, it serves as the ground connection.
- Pin #2 (+12V Supply): Typically red, this pin provides power to the fan.
- Pin #3 (Tachometer Signal): Often yellow, this wire sends a signal back to the motherboard to indicate the fan’s speed.
As per the references, the standard color coding for 3-pin fans is essential for ensuring proper wiring and functionality, particularly in lower-powered chassis fans.
You may also like


4-Pin Fans
4-pin fans are primarily used for CPU cooling, and they add an additional functionality to their 3-pin counterparts:
- Pin #1 (Ground): Black, like in 3-pin connectors, serves as the ground.
- Pin #2 (+12V Supply): Red, supplying power to the fan.
- Pin #3 (Tachometer Signal): Yellow, like the 3-pin version, indicating speed back to the motherboard.
- Pin #4 (PWM Control): Usually blue, this pin allows for Pulse Width Modulation (PWM), enabling speed adjustment based on temperature needs.
The addition of the PWM control pin in 4-pin fans allows for more precise control over fan speeds, contributing to noise reduction and power efficiency compared to 3-pin fans. This makes them more suitable for critical systems like CPUs.
Comparison of 3-Pin and 4-Pin Fans
| Feature | 3-Pin Fan | 4-Pin Fan |
|---|---|---|
| Wiring | 3 wires (Ground, +12V, Tachometer) | 4 wires (Ground, +12V, Tachometer, PWM Control) |
| Speed Control | Voltage-controlled | Pulse Width Modulation (PWM) |
| Common Usage | Chassis fans | CPU fans |
| Noise Level | Tends to be higher | Can be lower due to better speed management |
Understanding the distinctions between these fan types helps users select the right components for their needs and ensures optimal cooling performance in various computer systems.
Common Wiring Issues
Even with a clear understanding of the wiring, issues can arise during PC assembly or when replacing fans. Here are some common problems and their potential fixes:
Issue: Fan Not Spinning
If a fan isn’t spinning after installation, consider the following steps:
- Check the power connection to the fan, ensuring that the red (+12V) and black (ground) wires are correctly attached.
- Examine the tachometer signal wire (yellow) and see if it is properly connected to the motherboard.
- If using a PWM fan, verify that it is connected to a 4-pin header on the motherboard instead of a 3-pin header.
- Test the fan on a different header or system to rule out motherboard issues.
Issue: No Speed Control
For 3-pin fans, speed control is typically voltage-based. If a user expects variable speeds and only gets full speed, consider these adjustments:
- If the motherboard supports it, use fan control settings in the BIOS or software utilities.
- Consider replacing the fan with a 4-pin PWM fan if precise control is essential for the application.
FAQs
Q1: Can I run a 4-pin fan on a 3-pin connector?
A1: Yes, a 4-pin fan can work on a 3-pin connector, but it will not utilize the PWM feature, running solely at full speed based on voltage control.
Q2: What happens if I connect the fan wires incorrectly?
A2: Connecting the wires incorrectly can prevent the fan from operating or potentially damage the fan or motherboard.
Q3: Are there advantages to using 4-pin fans?
A3: Yes, 4-pin fans provide more efficient cooling and quieter operation because they can dynamically adjust speeds based on temperatures.
Q4: Can I control a 3-pin fan using software?
A4: While some motherboard software allows speed control through voltage, the control is limited compared to 4-pin PWM fans.
Q5: Why is the color coding not always standard?
A5: Although there are common color codes, deviations can occur with different manufacturers, so it’s essential to check the specifications.
Conclusion
In summary, understanding the color coding and functionality of 3-pin and 4-pin PC fans is essential for configuring and optimizing your computer cooling system. Knowing how to properly connect and troubleshoot these components ensures reduced noise and improved thermal management in your setup. For further information, refer to additional resources or manufacturers’ guides.
For those interested in manufacturer support, you can visit Thermaltake support.
